Dataverse Search (formerly Global Search) gives you a fast, relevance-ranked search experience across every table in your environment — instead of hunting through individual entity views one at a time. Here’s how to enable Dataverse search in your Power Platform environment, step by step, and — for developers and partners — how to build on top of it once it’s live.
This guide is split into two parts, because it serves two different readers:
- If you’re a system administrator or business user, Part 1 walks through exactly how to enable Dataverse search end to end — no code required.
- If you’re a partner or developer building custom apps, integrations, or AI-driven tools on top of Dataverse, Part 2 covers the Search API: how to query it, filter it, and use the results in real application logic.
Read the part that’s relevant to you, or read both — enabling search correctly in the first place is what makes the API worth calling.
Part 1: How to Enable Dataverse Search
Getting search working involves two levels of configuration: turning the feature on for your environment, and telling each table what it should index. Miss either step and search will either be unavailable, or available but returning empty results for tables you expected to see.
Step 1: Turn It On at the Environment Level
Dataverse Search is off by default in most environments, so it’s the first thing to check.
- Go to admin.powerplatform.microsoft.com
- Select Environments, then choose the environment you’re configuring
- Open Settings → Product → Features
- Toggle Dataverse search to On
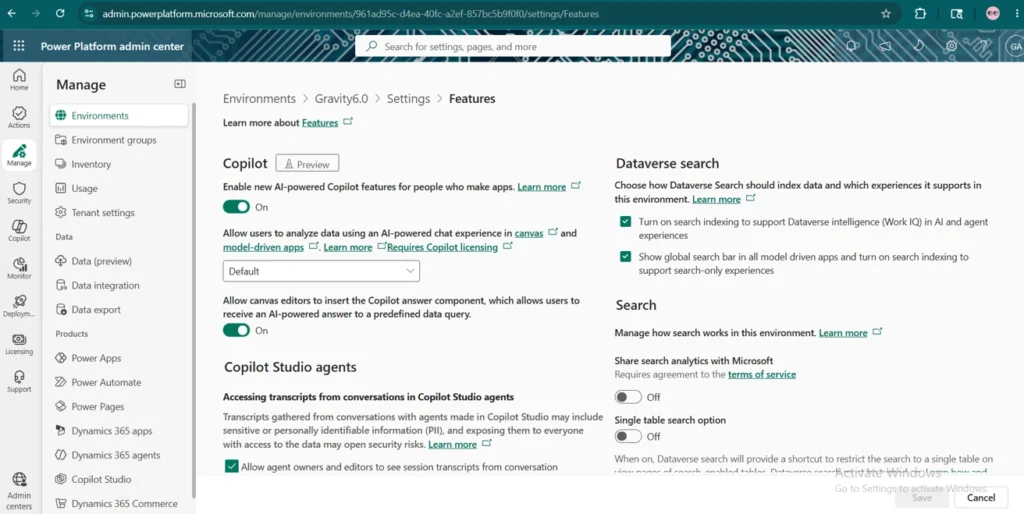
This is an environment-wide switch — once it’s on, every table becomes eligible for indexing, but none of them will actually appear in results until you complete Step 2 for each one.
Step 2: Enable Search at the Table Level
Environment-level activation doesn’t automatically index every table — each one needs to opt in individually.
- In the Power Apps maker portal, open the table you want searchable
- Go to its properties, then Advanced options
- Confirm “Appear in search results” is checked
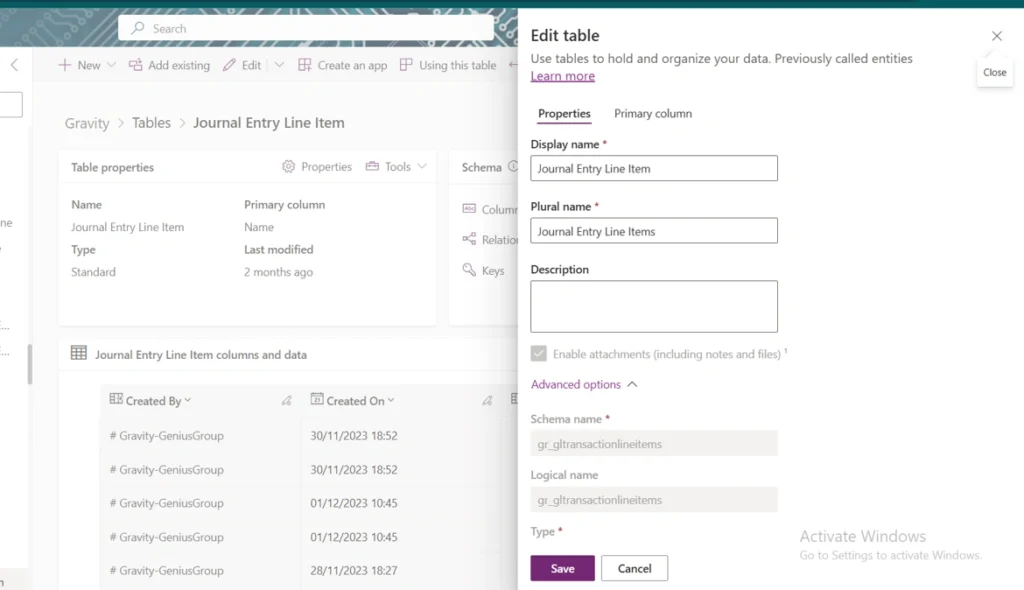
Do this for every table you want included. It’s a common gap: an admin enables search at the environment level, tests it against one table that happens to already be configured, and assumes the rest are covered — then gets support tickets when a colleague can’t find records in a table nobody explicitly enabled.
Step 3: Locate the Quick Find View
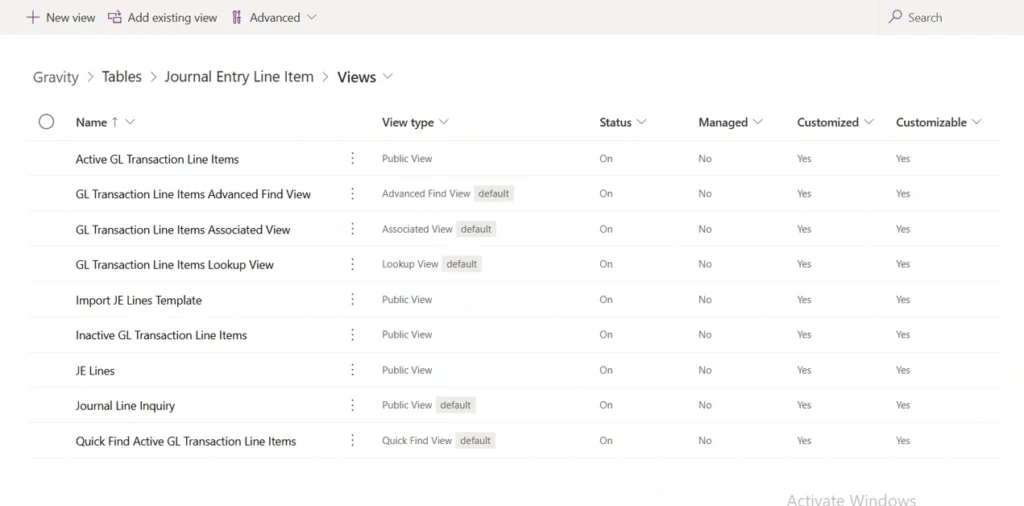
Dataverse Search uses each table’s Quick Find view to determine what’s indexed — so the columns configured there directly control your search results.
Go to the Views tab on your table and open the view usually named “Quick Find Active…”
Step 4: Choose Your “Find By” Columns
This is the step that determines actual search relevance, so it’s worth being deliberate rather than accepting the default.
- In the Quick Find view, use “Edit find table columns”
- Select the columns the search engine should index — think about what a user would actually type: a name, an account number, a reference ID, a short description
- Save and Publish your changes
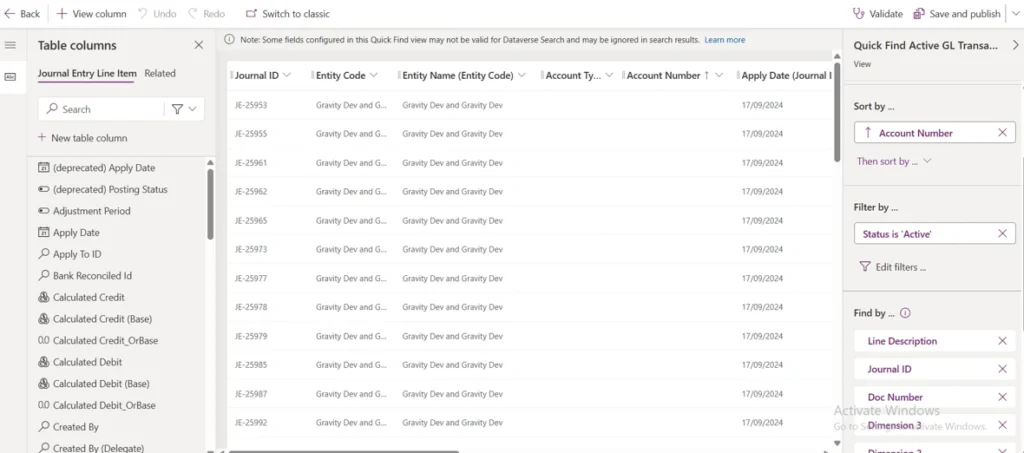
Indexing too few columns makes search feel broken (“I know that word is in the record, why can’t I find it?”). Indexing too many can dilute relevance and slow queries — so this is a genuine design decision, not just a checkbox exercise.
Step 5: Test It
Open your model-driven app and use the global search bar at the top. Search for a term you know exists in a record on one of your newly configured tables, and confirm it surfaces — across tables, not just within one entity view.
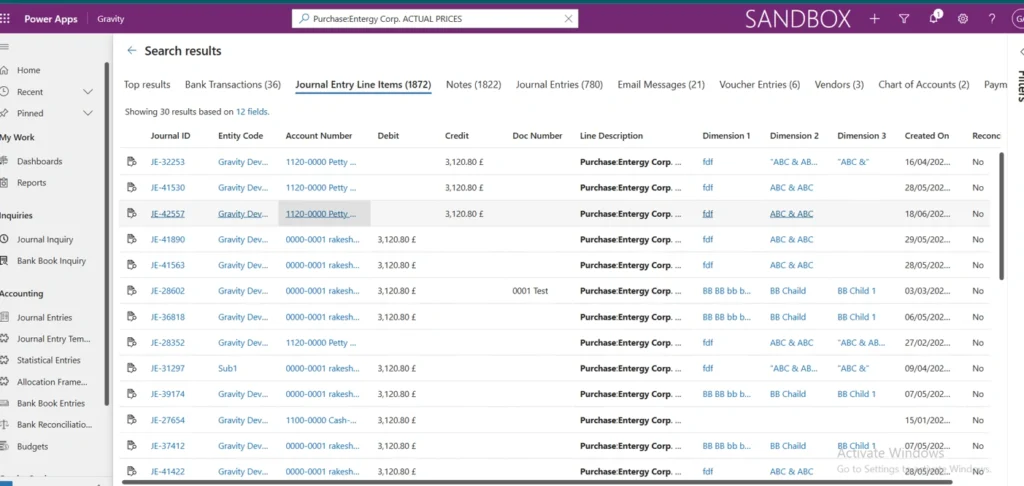
If a table isn’t showing results, it’s almost always one of two things: Step 2 wasn’t completed for that table, or the term you searched for isn’t in one of the columns selected in Step 4.
Part 2: Building on the Dataverse Search API
Once search is enabled and properly indexed, it’s available programmatically through the Dataverse Web API’s searchquery endpoint — which is where this gets genuinely useful for partners and developers building custom experiences, integrations, or AI-assisted tools on top of Dataverse data. The same Web API layer we walk through in our Dataverse MCP Server guide is what serves the Search endpoint too — same authentication model, same authorisation boundary.
Core Search Implementation
The foundation is a service that authenticates and posts a structured query to the search endpoint:
public async Task<IReadOnlyList<DataverseSearchHit>> QueryAsync(
    string searchTerm,
    IReadOnlyList<DataverseSearchEntity> entities,
    int top = 10)
{
    var requestBody = new WebApiSearchQueryBody
    {
        Search = searchTerm,
        Count = true,
        Entities = JsonSerializer.Serialize(entities, JsonOptions),
        OrderBy = "[\"@search.score desc\"]",
        Top = top
    };

    using var httpRequest = new HttpRequestMessage(HttpMethod.Post, _queryUrl)
    {
        Content = new StringContent(JsonSerializer.Serialize(requestBody, JsonOptions), Encoding.UTF8, "application/json")
    };

    httpRequest.Headers.Authorization = new AuthenticationHeaderValue(
        "Bearer", await _authProvider.GetCrmAccessTokenAsync());

    using var response = await _httpClient.SendAsync(httpRequest);
    var responseBody = await response.Content.ReadAsStringAsync();

    // Process and return result hits...
}
A few things worth noting about this shape:
OrderBydefaults to relevance (@search.score desc) — the same ranking signal driving the UI search experience in Part 1, now available to sort your own query results.Entitiesis a structured list, not a flat table name — which is what lets a single query span multiple tables with different search and filter rules per table, something the UI search bar doesn’t expose directly.- Authentication runs through the same bearer token flow as any other Dataverse Web API call, so if you’ve already got Dataverse API auth working elsewhere in your application, this slots in without new infrastructure.
Business Logic Usage
Here’s the service in use — searching one entity with a specific search column, a set of columns to return, and a filter to narrow the result set:
var hits = await _dataverseSearchService.QueryAsync(
    searchTerm,
    [new DataverseSearchEntity(
        Name: "gr_gltransactionlineitems",
        SearchColumns: ["gr_linedescription"],
        SelectColumns: ["gr_journalidid", "gr_companyid", "gr_accountnumber", "gr_applydate"],
        Filter: "gr_reconciled eq 1"
    )],
    top);
This is a good pattern to copy directly: SearchColumns controls what the free-text term matches against (mirroring the “Find By” columns from Part 1, Step 4), SelectColumns controls what data actually comes back, and Filter applies standard OData filter syntax on top of the search — in this example, restricting results to reconciled transaction lines only. Combining search relevance with a hard filter like this is where the API starts doing things the UI search box simply can’t.
API Output
The response is a ranked list of hits, each carrying a relevance score alongside the requested attributes 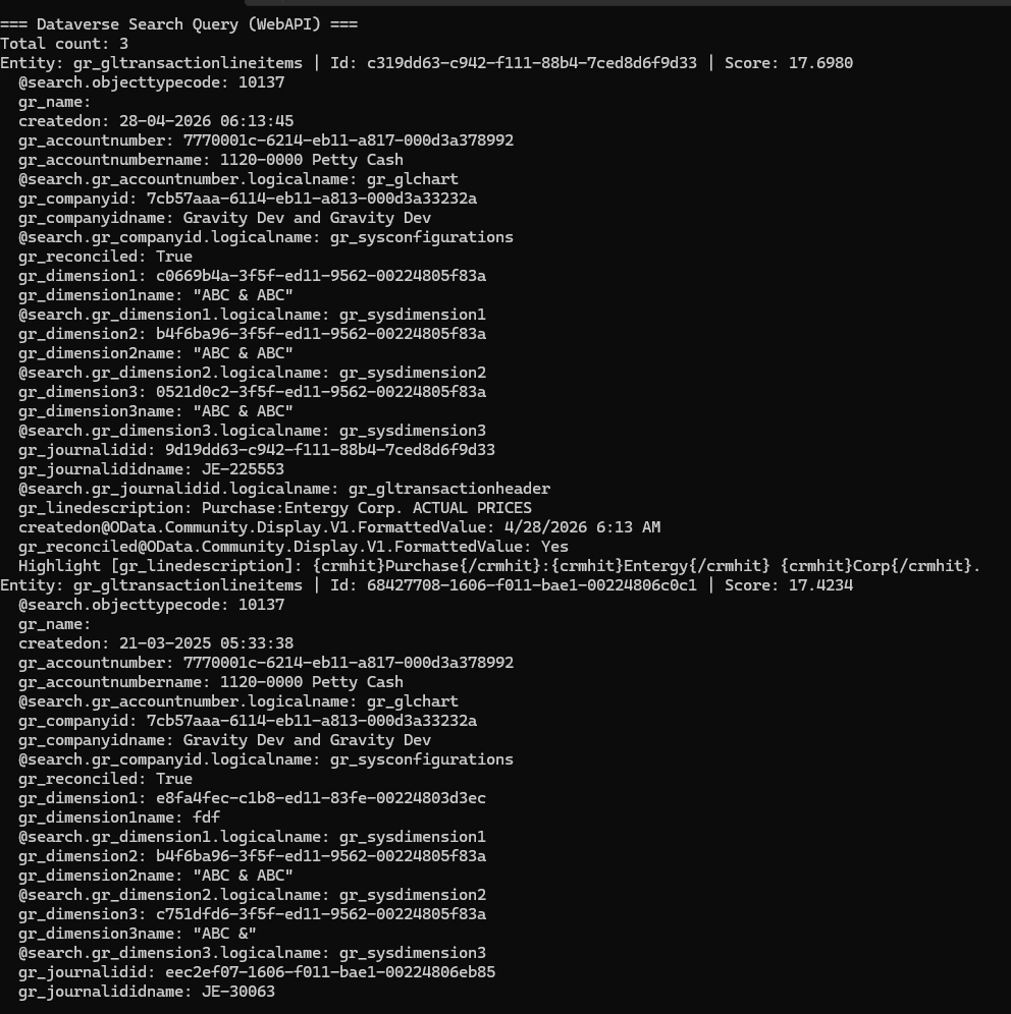 — so downstream code can sort, threshold, or display results with confidence about which matches are strongest, rather than treating every hit as equally likely to be what the user meant.
Where This Is Headed
The two halves of this guide aren’t really separate topics — they’re the same feature from two vantage points. Part 1 configures what gets indexed and how relevant it is; Part 2 is where that indexing pays off, letting you build search experiences, AI copilots, or automated workflows that reason over Dataverse data with real ranking and filtering behind them, not just a flat table scan.
Dataverse Search sits underneath many of the AI-agent patterns we cover elsewhere on the site — the Case Management Agent and Sales Qualification Agent both benefit from well-configured search on their target tables, because the agent’s ability to find the right record is only ever as good as the index it’s working against.
Building custom Dataverse integrations, AI-assisted tooling, or Copilot-style experiences? MTC delivers this kind of engineering work as a white-label partner for Microsoft partners and directly for end-user organisations. Explore our Azure AI Foundry + Copilot Studio services or email salesteam@mtccrm.com.