Everything a CRM functional consultant needs to set up, configure, and optimise the timeline for customer-facing teams.
The Timeline Control is one of the most visible and business-critical components in any Microsoft Dynamics 365 model-driven app. It is the first place a sales rep looks before a call, the first section a service agent reads when a case comes in, and the primary audit trail a manager reviews when a deal goes quiet.
Yet most Dynamics 365 implementations use it out of the box — with default settings that rarely match how the business actually works.
This guide covers everything from adding a timeline to a form, to advanced configuration options, AI-powered highlights with Copilot, custom activity types, performance best practices, and known issues to watch out for. Whether you are setting up a brand-new environment or optimising an existing one, this is the reference to keep open.
What Is the Dynamics 365 Timeline Control?
The Timeline Control is an embedded component in Dynamics 365 model-driven apps that displays a chronological history of all interactions related to a record. On an Account form, it shows every phone call, email, task, appointment, note, and post linked to that customer — in one unified view, sorted newest first by default.
What the timeline captures:
- Activities — Phone calls, emails, tasks, appointments, and any custom activity types added through solutions
- Notes — Free-text entries with file attachments, supporting rich text formatting
- Posts — System-generated auto-posts (e.g., “Status changed to Won”) and user-posted messages for team collaboration
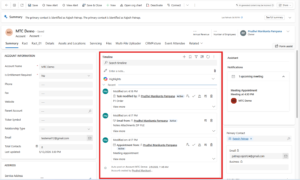
The timeline is not just a log — it is an action centre. Users can create new activities, reply to emails, pin critical notes, and filter by record type, status, or date range — all without leaving the record they are working on.
Where the Timeline Fits in Dynamics 365
The timeline appears on forms for standard tables such as Account, Contact, Lead, Opportunity, Case, and Work Order. It is also available on any custom table configured as an Activity table.
A single table can have multiple forms, and each form can have its own independently configured timeline. For example, the Account table has three standard forms (Account, Account for Interactive Experience, Account Quick Form) — and the timeline on each one can behave differently.
This matters for functional consultants: if you configure the timeline on one form and users are not seeing the change, check which form they are actually using in the app.
How to Add a Timeline to a Form
If you are working with a custom table or a form that does not yet have a timeline, here is how to add it:
- Sign in to Power Apps
- Select Tables in the left navigation and open the table you want
- Select the Forms area, then open the target form
- In the form designer, select Components from the left navigation panel
- Scroll down to find the Timeline component
- Drag and drop it into any section on the form
- Select Save, then select Publish to make the change live
Note for custom tables: For the timeline to display custom activity types, the custom table must be configured with Type = Activity when it is created. This cannot be changed after the fact. If you want attachments visible on the timeline for a custom activity, also check Enable attachments at table creation time.
You can add multiple timeline components to a single form — useful when you want to separate internal notes from customer-facing activity, for example.
Configuring the Timeline Component — Display Options
Once the timeline is on the form, select it and navigate to its Properties panel. Configuration is split into three areas: Display options, Advanced, and Record settings.
Timeline Component Name
The Name field under Properties is a unique internal reference for the app maker. It does not appear to end users. Important constraints:
- No spaces allowed — use underscores (e.g.,
customer_timeline) - Cannot change the heading label that users see — it always shows as “Timeline” at runtime
Records Shown Per Page
Controls how many timeline entries load before a “Load more” button appears. The default is 10. You can set this up to 50.
Consultant Tip: Keep this at 10–15 for Customer Service environments where agents work cases with high activity volume. Loading 50 records immediately slows form load time, especially on standard hardware.
Record Types to Show
Three primary record types are enabled by default: Activities, Notes, and Posts.
| Record Type | What It Contains |
|---|---|
| Activities | Phone calls, emails, tasks, appointments, custom activities |
| Notes | Free-text notes with rich text formatting and file attachments |
| Posts | Auto-posts (system events) and user posts (team messages) |
Note: Posts require a Dynamics 365 app licence (e.g., Customer Service, Sales). Posts are not available in standard Power Apps environments without Dynamics 365 apps enabled.
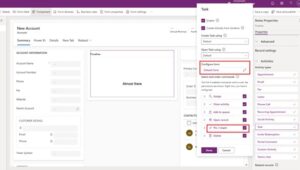
To show or hide a type, check or uncheck the box next to it. The change is immediately reflected in what the “Create a timeline record” dropdown offers users.
Advanced Timeline Settings
The Advanced section controls behaviour that applies across all record types.
Quick Entry Record Type
Sets whether clicking the compose area below the search bar opens a Note or a Post by default. Notes is the default setting.
- Choose Notes if your users primarily log call summaries and case updates in free text
- Choose Posts if your team uses the timeline for internal collaboration and commentary
Sort Order Default
Controls whether the most recent or oldest record appears at the top. Default is Descending (newest first).
Most CRM users expect newest-first. Only change this to Ascending if you have a specific process where users need to read the history from start to finish (e.g., complaint handling with a strict chronological review requirement).
Enable Filter Pane
The filter pane lets users narrow the timeline by record type, activity type, activity status, date range, and more. It is enabled by default.
Available filter categories include:
- Record type — Notes, Activities, Posts
- Activity type — Appointment, Email, Phone Call, Task, and all installed custom types
- Activity status — Active, Overdue, Closed
- Activity due date — Next 30 days, Next 7 days, Last 7 days, Last 30 days
- Posts by — Auto post, User posts
- Modified date — Last 24 hours, Last 7 days, Last 30 days
You can also set default filters that are applied every time a form loads using Edit filter pane. For example, a service desk manager’s view could default to showing only Active and Overdue items — so agents immediately see what needs attention.
Enable Search Bar
Enables a search box at the top of the timeline that searches the title, body, and description of timeline records. Enabled by default. Disable only if the search bar is causing confusion for users who should not be searching historical records.
Expand All Records in Timeline
When enabled, all activity records display in their expanded view by default — showing full email bodies, note text, and call descriptions without requiring a click to expand. Disabled by default.
Enable this for roles like account managers who need to read full context quickly. Disable it for high-volume service agents who need a compact summary view.
“What You’ve Missed” Summary
Displays new records at the top of the timeline when a user opens or refreshes a record — flagging changes that occurred since their last visit. Enabled by default. This is especially valuable for shared records worked by multiple team members.
Configure Email Commands
For email records on the timeline, you can configure which command buttons appear and in what order: Reply, Reply All, Forward. Reply All is the default first option. Drag and drop to reorder. Remove options that are not relevant to the team’s workflow.
Record Settings — Activity Types
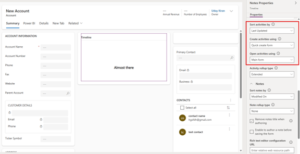
Under Record settings, expand Activities to see every activity type available in your environment. Each type can be individually enabled or disabled for the timeline.
Performance Warning: If you enable more than 10 activity types, Dynamics 365 displays a warning that timeline load performance will be impacted. Keep enabled types to 10 or fewer.
For each enabled activity type, you can configure:
| Setting | What It Controls |
|---|---|
| Status tags | Show Active / Overdue / Closed badge on the record card — enabled by default |
| Create directly from timeline | Whether this activity type appears in the “+ Create” dropdown — enable for types users create frequently |
| Create activities using | Form type used when creating: Default, Quick Create, Main Form, or Main Form Dialog |
| Open activities using | Form type used when opening an existing record |
| Command actions (Preview) | Assign, Close, Delete, Open record, Add to queue — select up to 5 per activity type |
| Card form | Which card form layout to use for displaying this activity on the timeline |
Consultant Tip: Set Create activities using = Quick Create for Phone Calls and Tasks — agents should be logging these in under 30 seconds. Set Open activities using = Main Form so they can see full detail when they need to review or edit.
Display Related Records
For each activity type, you can enable Regarding records to show linked entities (Accounts, Contacts, Cases, Opportunities) directly on the timeline card. Useful for rollup timelines where the same activity appears under multiple related records.
Understanding Activity Rollup
The activity rollup setting controls which activities appear on an Account or Contact timeline — not just activities directly related to the record, but activities that “roll up” from related records.
Three rollup types are available for Account and Contact tables:
| Rollup Type | What Appears on Timeline |
|---|---|
| Extended | Activities from the account/contact AND related records (cases, opportunities, etc.) |
| Related | Activities directly related or one level of relationship away |
| None | Only activities directly related to this record |
Most CRM implementations for Sales use Extended rollup on the Account timeline — so a key account manager sees every interaction across all opportunities and cases for that customer in one view.
Card Forms — Customising What Appears on Each Activity Record
By default, each activity type uses a standard card layout. You can customise this by editing the card form for each activity type.
Card forms have four sections, but only two are visible in the collapsed timeline view:
| Section | Visibility | Columns Displayed |
|---|---|---|
| ColorStrip | Not visible | Visual band on the left edge |
| Header | Always visible | First 2 columns (e.g., Subject, Modified On) |
| Details | Visible on expand | First 3 columns (e.g., To, CC, Description) |
| Footer | Not visible | Hidden — not shown to users |
Key card form rules:
- Header Column 1 always appears as the bold title of the timeline record
- Header Column 2 always appears in the bottom-right corner (use for dates)
- Details Column 1 acts as a sub-header below the title
- Details Column 3 is only visible when the record is expanded
For most implementations, customising the Email card form delivers the most value — showing the recipient, a preview of the body, and the date at a glance without expanding.
Sorting Activities in the Timeline
The default sort is Last Updated (Descending). You can change the sort column per activity type in Record settings.
For advanced sorting scenarios — such as sorting by a custom business date rather than the system modification date — use the Sort date field. This is an empty field by default that you can populate via:
- Power Automate — trigger a flow when an activity is created/updated
- Business rules — set the sort date based on record conditions
- JavaScript — for complex conditional logic
Important constraint: Sort date must be configured for every activity record in the timeline — if even one record has a blank sort date, sorting behaviour becomes unpredictable. Also configure it across all three main forms for tables like Account.
Timeline on Dashboards
You can add the timeline to a personal or system dashboard, but with important limitations:
- Dashboard timelines use the legacy designer — the new Power Apps form designer experience is not available for dashboards
- Dashboard timelines show records related to the current logged-in user — each user sees different data
- Notes are not available on dashboard timelines
- Configuration options are more limited than form-embedded timelines
For most functional implementations, the form-embedded timeline is the right choice. Use dashboard timelines only for specific “my activity today” type views.
Timeline Highlights — AI-Powered Summaries with Copilot
Timeline Highlights is a Copilot-powered feature that generates an intelligent summary of significant activities on a record. Instead of scrolling through 50 emails and call notes, users see a concise AI-generated summary of what matters most.
Prerequisites
- Copilot must be enabled in model-driven app settings
- Environment must have Enable Dynamics 365 apps turned on
- Requires Power Platform environment with Dataverse
How to Enable at App Level
- In Power Apps, select your model-driven app
- Select Settings from the command bar
- Go to Upcoming tab
- Turn on Enable Timeline Highlights
- Save and Publish
How to Enable at Form Level
- Open the target table in Power Apps → select Forms
- Open the specific form
- Select Enable Timeline Highlights powered by Generative AI
- Save and Publish
Timeline Highlights pulls from notes, emails, tasks, appointments, phone calls, and conversations. It is a strong adoption driver for new users who feel overwhelmed by a high-volume timeline.
Modern Timeline Control Experience
Microsoft has introduced a Modern Timeline Control experience — a refreshed visual interface that aligns with the latest Power Apps design system. It is disabled by default and does not replace the classic experience automatically.
How to Enable
- In Power Apps, open your model-driven app
- Select Settings → Upcoming
- Set Enable a modern Timeline control experience to Yes
- Save and Publish
Current Limitations
- Available in model-driven apps only
- Some legacy customisations may not behave identically to the classic timeline
Enable this in non-production environments first, test your custom card forms and activity configurations, then promote to production.
@Mentions in Notes and Posts
Users can @mention colleagues in notes and posts on the timeline, triggering notifications. This is a collaboration feature useful in Customer Service and Sales teams working shared accounts.
Configuration requirements:
- Users must have the Read privilege on the
msdyn_postconfigentity - Users must have the Share privilege on the entity where @mentions are used (e.g., Account, Contact, Case)
Important: @mentions do not work in environments created with “Enable Dynamics 365 apps” set to No. In-app notifications work for @mentions in Notes only — not Posts. If you need colleagues to receive notifications, advise your users to @mention in notes rather than posts.
Pinning Activities to the Top of the Timeline
Users can pin important notes or activities to the top of the timeline so they are always visible without scrolling. This is particularly useful for:
- Critical escalation notes on a Case
- Key agreement details on an Opportunity
- SLA breach warnings on an Account
Notes are enabled for pinning by default. To enable pinning for other activity types (Tasks, Appointments, Phone Calls, etc.):
- In the timeline configuration → Record settings → expand the activity type
- Check the Pin / Unpin checkbox
- Save and Publish
Custom Activity Types on the Timeline
You can display custom tables on the timeline by configuring the table as an Activity type at creation time:
- When creating the new table, set Table Type = Activity
- Check Enable attachments if users should be able to attach files
- After creating, configure the custom activity in the timeline’s Record settings the same way as standard activities
Custom activities are useful for industry-specific interactions — for example, a Site Visit activity for Field Service, a Consultation Note for healthcare, or a Contract Review activity for legal workflows.
Performance Best Practices
| Practice | Reason |
|---|---|
| Limit enabled activity types to 10 or fewer | Exceeding this triggers a performance warning and noticeably slows form load |
| Set Records shown on page to 10–15 | Avoids loading large datasets on every form open |
| Use default filters for high-volume entities | Agents see only relevant, actionable records immediately |
| Avoid enabling Expand all records for high-volume cases | Rendering full email bodies for 20+ records significantly increases load time |
| Use Sort date carefully | Only implement if all activity records are guaranteed to have the field populated |
Known Issues and Workarounds
Duplicate Posts When Sorting Older to Newer
The timeline API for posts does not support ascending sort. When sorting oldest-first, duplicate or incorrect posts may appear.
Workaround: Use Notes instead of Posts when chronological review is required.
Only One Attachment from the Attachment Button
Notes support only one attachment via the attachment button.
Workaround: Drag and drop multiple files directly into the note body for multiple attachments.
Timeline Fails to Load (Error 0x8004430d)
Occurs when more than 15 different tables are associated with a timeline.
Fix: Disable some activity types in Record settings, or follow the Microsoft support workaround.
“$&” Characters Converted in Notes
A rich text editor configuration issue.
Fix: Add "removePlugins": "stickystyles" to the rich text editor config file.
WebP Images Not Displayed
Timeline does not support WebP image format.
Fix: Convert images to JPEG or PNG before attaching to timeline records.
Frequently Asked Questions
Can I add the Timeline Control to a custom table?
Yes — as long as the table is not a simple lookup or configuration table, you can drag the Timeline component onto any custom table form in the Power Apps form designer.
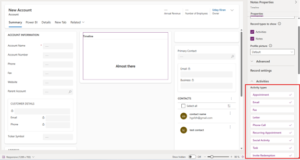
Why is the Timeline not showing any data in the form designer?
This is expected behaviour. The form designer has no underlying data, so the timeline shows “Almost there” or remains blank. Preview the live form in a published app to see real data.
Can I have more than one timeline on the same form?
Yes. You can add multiple timeline components to a single form and configure each one differently — for example, one showing only Activities and another showing only Notes.
Why can’t I see Posts on the timeline?
Posts require a Dynamics 365 app licence (Customer Service, Sales, etc.) and the environment must have “Enable Dynamics 365 apps” set to Yes. Posts are not available in base Power Platform environments.
How do I stop a specific activity type (e.g., Fax) from appearing?
In the timeline Record settings, expand Activities, find the activity type, and uncheck Enable. Save and Publish. Note that Fax and Letter are disabled by default.
What is the difference between Timeline Highlights and the standard “What You’ve Missed” summary?
“What You’ve Missed” shows new records added since your last visit. Timeline Highlights is AI-powered — it uses Copilot to summarise the most significant activities across the entire timeline history, not just recent changes.
Can I use Timeline Control on a dashboard?
Yes, but with limitations — dashboard timelines use the legacy designer, show only the current user’s related records, and do not support Notes.
Summary: Key Configuration Decisions for Functional Consultants
Before you configure a timeline, answer these five questions for each form/role:
- Which activity types does this role create and consume? — Enable only those. Disable the rest.
- Should users create activities directly from the timeline? — Enable “Create directly from timeline” for the types they log most frequently.
- What should the default view look like? — Set default filters, sort order, and whether to expand records.
- Is high-volume activity expected? — If yes, keep records-per-page low, disable Expand All, apply default filters.
- Is Copilot available in this environment? — If yes, enable Timeline Highlights for any customer-facing role.
The timeline is one of the highest-leverage components in Dynamics 365 — a well-configured one visibly improves CRM adoption and user efficiency. A poorly configured one is the number-one reason users say “the system doesn’t show me what I need.”
Need Help Configuring Dynamics 365 for Your Team?
At MTC, our certified Dynamics 365 consultants configure model-driven apps, custom activities, and CRM workflows for mid-market businesses and ISVs worldwide. Whether you are implementing Dynamics 365 for the first time or optimising an existing deployment, we bring the functional depth to get it right.
Schedule a Consultation →
Explore Our Dynamics 365 Services →
Browse Our Dynamics 365 Add-Ons →