
If you’ve built an AI agent in Microsoft Copilot Studio, you’ve probably hit the same wall every Microsoft partner hits: the agent is smart, but it can’t reach your CRM data. It can answer general questions, but it can’t tell a user which companies are configured in the system, run an accounting report, or look up a record.
The Model Context Protocol (MCP) solves this. It’s an open standard that lets a Copilot Studio agent call your own tools — functions you write that read and write live CRM data — through a secure, hosted server.
This guide shows you how to connect an MCP server to your CRM end to end: build and host the server on Azure, register it in Copilot Studio, wire up OAuth authentication, and test it inside a model-driven app. We’ll use a working example from our own Gravity ERP platform throughout, so you can see exactly what the code looks like.
New to Copilot Studio? Start with our complete guide to building AI agents in Copilot Studio, then come back here to connect it to your CRM.
What is MCP and why it matters for Microsoft partners
The Model Context Protocol is an open standard that defines how an AI agent discovers and calls external tools. Instead of hard-coding integrations, you expose a set of tools from a server, and the agent reads each tool’s description to decide when to call it.
For Microsoft partners, this is a significant shift. It means:
- Your Copilot Studio agent can work directly against your client’s CRM or ERP data — securely, with the user’s own permissions.
- You write the tools once in C#, host them on Azure, and any Copilot Studio agent in the environment can use them.
- The agent figures out which tool to call and when, based on the tool descriptions you write — no rigid scripting.
The result: an agent that can answer “show me all companies configured in the system” or “run the trial balance report for Contoso” by calling real functions against real data.
If you’re specifically working with Microsoft Dataverse, you can also use the Dataverse MCP Server directly with GitHub Copilot and Visual Studio Code. Read our guide on Getting Started with Dataverse MCP Server and Visual Studio Code to learn how to enable Dataverse MCP, connect Visual Studio Code, query records, explore metadata, generate FetchXML, and create plugin steps using natural language.
How the architecture works
There are four layers to an MCP-connected CRM agent:
1. The MCP server (your code) — an ASP.NET Core Web API that exposes CRM tools. Each tool is a C# method that does one job: list companies, fetch a record, run a report.
2. Azure App Service (hosting) — the server is published to Azure, giving you a secure HTTPS endpoint like https://your-app.azurewebsites.net.
3. OAuth 2.0 (security) — authentication via Microsoft Entra ID, so only authorised users can call the tools, and each user only sees the data their CRM permissions allow.
4. Copilot Studio (the agent) — connects to your MCP endpoint, discovers the tools automatically, and calls them in response to natural-language questions.
The agent never touches the database directly. It calls your tools, your tools enforce security and business logic, and the data flows back as a clean response.
Step 1 — Build and host the MCP server
Create a new ASP.NET Core Web API project (.NET 9). Add a Tools folder and implement one class per CRM domain — Companies, Contacts, Accounts, Reports, and so on.
Each tool class is marked with [McpServerToolType], and each method with [McpServerTool]. The framework auto-discovers and registers them at startup, so you don’t wire anything up manually.
Here’s a real example — a CompanyTools class that exposes two read-only tools: list all companies, and fetch one company by its ID.
using Gravity.MCPServer.Application.Interfaces;
using ModelContextProtocol.Server;
using System.ComponentModel;

namespace Gravity.MCPServer.Tools.Company;

[McpServerToolType]
public class CompanyTools
{
    private readonly ICompanyService _companyService;

    public CompanyTools(ICompanyService companyService)
    {
        _companyService = companyService;
    }

    [McpServerTool]
    [Description("Get a list of all companies/entities configured in the system. " +
        "Returns name, master flag, default currency, multi-currency/multi-company " +
        "settings, and dimension configuration.")]
    public async Task<string> GetCompanies(
        [Description("Number of records to return (default: 20, max: 200)")] int top = 20)
    {
        try
        {
            top = Math.Clamp(top, 1, 200);
            return await _companyService.GetCompaniesAsync(top);
        }
        catch (Exception ex)
        {
            return $"Error retrieving companies: {ex.Message}";
        }
    }

    [McpServerTool]
    [Description("Get detailed information about a specific company/entity by its " +
        "unique identifier. Returns full configuration including fiscal settings, " +
        "dimensions, and remit-to address.")]
    public async Task<string> GetCompanyById(
        [Description("The unique identifier (GUID) of the company/entity.")] string companyId)
    {
        try
        {
            if (!Guid.TryParse(companyId, out var id))
                return "Invalid company ID format. Please provide a valid GUID.";

            return await _companyService.GetCompanyByIdAsync(id);
        }
        catch (Exception ex)
        {
            return $"Error retrieving company: {ex.Message}";
        }
    }
}
A few things worth noticing in this code, because they’re what separate a demo from something production-ready:
- The
[Description]attributes are not documentation — they’re instructions to the AI. Copilot Studio reads them to decide when to call each tool and what to pass. Write them as if you’re briefing the agent, because you are. Vague descriptions lead to the agent calling the wrong tool. - Input is validated before it reaches the service.
Math.Clamp(top, 1, 200)caps the result size so the agent can’t trigger a runaway query, andGuid.TryParserejects a malformed ID with a friendly message instead of throwing. - The service layer enforces access control.
GetCompanyByIdAsyncreturns data only for companies the authenticated user is allowed to see — security lives in the service, not the tool.
Once your tools are written, publish the project to Azure App Service. Your MCP endpoint will be live at https://your-app-name.azurewebsites.net.
Production note: This example returns
ex.Messagedirectly so you can see what’s happening during development. In production, log the full exception server-side and return a generic message to the agent — you don’t want internal details surfacing in a chat response.
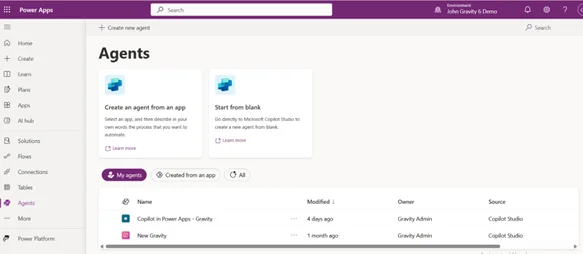
Step 2 — Open Power Apps and go to Agents
Open Power Apps and select the environment that contains your CRM. In the left navigation, click Agents.
You’ll see every agent created in this environment. You can open an existing one or create a new agent.
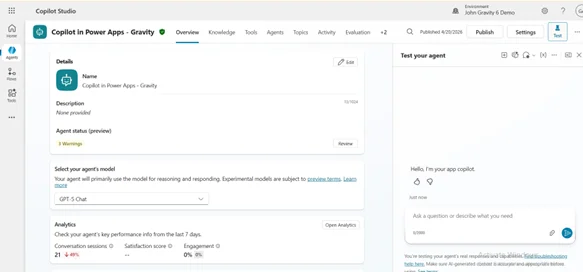
Step 3 — Open or create an agent in Copilot Studio
Click an existing agent to open it in Copilot Studio, or click + Create new agent to start from scratch. The agent overview page shows its status, analytics, and model settings.
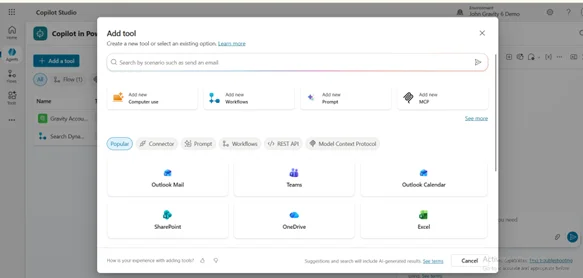
Step 4 — Add a new MCP tool
Inside the agent, click the Tools tab in the top navigation bar.
Click + Add a tool. The Add tool dialog opens, showing all available tool types.
Click Add new MCP.
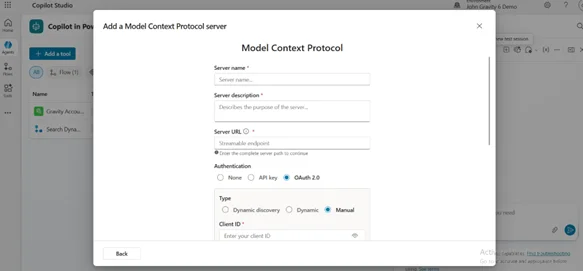
Step 5 — Configure the MCP server connection
Fill in the Add a Model Context Protocol server dialog:
- Server name — a friendly display name for this MCP connection
- Server description — a brief description of what the server provides
- Server URL — your hosted endpoint, e.g.
https://your-app-name.azurewebsites.net - Authentication — select OAuth 2.0, then Manual
- Client ID — your Microsoft Entra ID app registration Client ID
- Client Secret — your app registration Client Secret
- Token URL —
https://login.microsoftonline.com/<Tenant-ID>/oauth2/v2.0/token - Scope —
api://<Client-ID>/mcp:tools
Click Save to create the connection.
Where do the Client ID, Secret, and Token URL come from? They’re generated when you register your MCP server as an application in Microsoft Entra ID. If you haven’t done this yet, follow Microsoft’s official guide: Register an application with the Microsoft identity platform. You’ll create the app registration, generate a client secret under Certificates & secrets, and expose the
mcp:toolsscope under Expose an API.
Step 6 — Review and enable the available tools
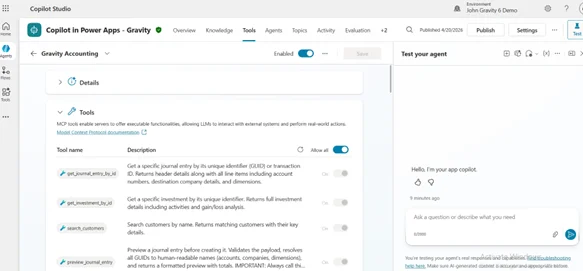
Copilot Studio automatically calls your server’s tool discovery endpoint and lists every tool your MCP server exposes, with each tool’s name and description.
Toggle Allow all to enable everything, or switch individual tools on and off depending on what you want the agent to be able to do. This is where the [Description] text you wrote in Step 1 shows up — clear descriptions make this screen self-explanatory.
Step 7 — Publish the agent
Click Publish in the top-right corner of Copilot Studio. Publishing makes the agent available inside your model-driven app and any other channel you’ve configured (Teams, websites, and so on).
Wait for the Published confirmation before testing.
Step 8 — Test the agent in the model-driven app
Open your model-driven Power App — Dynamics 365 Sales, or a custom app. The Copilot panel appears on the right side of the screen.
Ask a question in plain English, for example:
“List all the companies configured in the system.”
The agent reads your tool descriptions, decides GetCompanies is the right tool, calls your MCP server, and returns a summarised response — pulling live data straight from your CRM.
Frequently Asked Questions
What is an MCP server in the context of Dynamics 365? An MCP server is a hosted application that exposes a set of tools an AI agent can call. In a Dynamics 365 context, those tools read and write CRM data — listing records, running reports, updating fields — so a Copilot Studio agent can act on live data through natural language.
Do I need to write code to connect an MCP server to Copilot Studio? You need code to build the MCP server itself (the tools, in C#). Connecting it to Copilot Studio is configuration-only — you paste in the server URL and OAuth details, and Copilot Studio discovers the tools automatically.
How is the connection secured? Through OAuth 2.0 with Microsoft Entra ID. Each call is authenticated, and your service layer enforces that users only access data their CRM permissions allow. The agent never connects to the database directly.
Can the agent call multiple tools in sequence? Yes. The agent reads each tool’s description and chains them as needed. A well-written description (for example, “call this first to fetch the parameter schema, then call run-report”) guides the agent to use tools in the right order.
Does this work with any CRM, or only Dynamics 365? The MCP server pattern works with any system you can write a service layer against. We use Dynamics 365 and our Gravity ERP platform here, but the same approach connects Copilot Studio to any CRM or ERP with an accessible API.
Conclusion
Connecting an MCP server to your CRM turns a Copilot Studio agent from a generic chatbot into a tool that works against live business data — securely, with each user’s own permissions. The pattern is straightforward: write your tools in ASP.NET Core, host on Azure, register the server in Copilot Studio, and wire up OAuth. From there, the agent does the rest.
For Microsoft partners, this is one of the sharpest ways to differentiate in 2026. Most partners are still building agents that only answer questions. Connecting them to real CRM data through MCP is what makes them genuinely useful to clients.
MTC builds production MCP integrations on Dynamics 365, Power Platform, and our own Gravity ERP. If you want help connecting AI agents to your client’s data, talk to our team.